Tuesday, May 31, 2016

NEED TO WIN LOTTERY

     Some days I just have to shake my head at my husband!  A few nights ago we meandered around on our property here at the mill to enjoy the quite, peaceful sounds of summer.  Gazing at our renovated flour mill house as it was a sight with each window adorned by a single lit candle light, my husband turned to our other delapitated  structures amongst our property.

     I just knew what he was thinking!  Ross had his wheels turning (look out!).  He started talking about our pre civil war house on our property, just a short distance from our  mill house.  I am thinking to myself, I just know he's going to say it!  So I said it.....Don't even think about it Mr. Halverson!  We have not even finished the mill yet.  He said it.....Never say never!  It can be done.....we just start by doing this and that and the other thing.  I had to remind him that we do not have the budget for this very delapitated house.

     On this property besides this pre civil war house, there is also an old greenhouse.  The last person to ever live in that house, was born and raised there.  He never married nor had children.  He used this greenhouse to raise and sell geraniums.  I have in my plans someday to fix up this old greenhouse.  I called dibs on this structure when we purchased this property!  This gentleman who resided on this property was also a blacksmith.  Yes, this property also has an old blacksmith shop which is also delapitated.  My husband called dibs on that structure.

     In fact he has managed to clean out one side of the blacksmith shop.  This property is very unique and we are very blessed to own it.  Right now we are just dreamers and can only imagine and visualize all the possibilities in which to make these other buildings beautiful again.  This is where the need to win the lottery comes in to play, hahaha!

     We are on a very strict budget and now the only way these structures can come to be again is by winning the lottery.  So in the meantime, we dream, and dream big!  Here are some photos of the old house, greenhouse, and blacksmith shop.

This is the pre civil war homestead on our property not far from the mill house.  The siding on this house has asbestos on it and would cost a fortune to remove it.  Underneath is this beautiful, weathered white clapboard.


This is the blacksmith shop.  Half side is almost cleaned out, but oy vay ! look at the mess in the other side!

Remnants left inside of this blacksmith shop just as they were left from the previous owner.

Entrance to greenhouse.  My dog Cooper thinking I am going to open the door for him to go in and check it out before I enter.  He is our security dog, lol!  Love this old dutch door that upper can open alone.  Has a really cool outer garden area that would be beautiful to have a few chairs, table, benches or whatever.


Here is a view of the asbestos covered greenhouse.  Oh, the possibilities!


Saturday, May 28, 2016

     Hope everyone is enjoying this Memorial weekend.  It is a time to remember all those who have served or are still serving our country.  I have 2 sons that are vets and am grateful everyday that they came back home safely.

     I can not believe what I woke up to this morning when I checked my phone.  I seen that my Intagram feed was very busy last night, I mean really busy!  I have over 1K new followers!  Yes, that is correct, not a typo!  I thought what on earth triggered this wave of attention all the sudden?  Well come to find out I was tagged in Marion aka Miss Mustard Seed's Instagram feed.  I for one could not believe that she took notice of little old me and our mill house project.  Miss Mustard Seed is like a celebrity!  I never miss one of her blog posts, ever!  She has to be one of the most talented women in this country!

     I am so humbled by all the exposure that has come forth during our renovation of this mill.  I am just so humbled by all the sweet, most genuine, thoughtful comments, just so humbled!  I just don't know how to tell you all how very thankful I am for all the support and kindness I have been receiving!!

     I am also getting quite a few requests for my cow print.  I am going to open up an Easy account the next chance I get.  I will post it on my IG and FB sites as well as here when it's ready.

     I do wish that I could reply directly to each comment on my blog.  I will have to see if that is possible.  I have been asked what paint I have used for my walls in this mill.  Since we are on a budget we did not go with the latest and greatest but instead tried a brand that is carried by Menards called Conco.  It is a very soft white called Antique white 300/3.  It works for me.

     Another question that was asked was how do we heat this old Mill.   We have in floor heating in the basement(family room), and the main floor.  Since we have an open atrium to the second floor where our bedroom is, the heat rises and has kept us pretty warm.  This past winter in our home, which was our first since moving here,  had a few bumps and hiccups but we made it through a long, cold winter.  We found quite a few areas that were drafty that we had to fix and such.

     So last but not least, I thought I would share with you what I was tinkering on this morning.  I have this old, tall wooden ladder that I placed leaning on a wall in our living area.  I then wanted to do something to it besides hanging quilts on it.  I had brainstormed a short while and then the lightbulb came on......gathered 3 baskets.....attached them to the ladder......added magazines, and now it is a functional, cool piece that fits perfectly in the space.  So it was pretty easy peazy as my grandson would say!

     Have a safe, relaxing weekend my friends!


I attached a screw to the ladder on each corner of the basket to secure.  The baskets were also placed so that the bottom backs had secure support using a rung of the ladder.  By doing so it kept the baskets from wanting to tip forward if something heavier was added in a basket.


Thursday, May 19, 2016

What a difference paint can make

Happy Thursday!  Finally tackled a bedroom wall here in the mill house.  This wall took 2 days to paint.  The walls upstairs in this Master bedroom are almost 16 feet tall, the wooden shiplap walls are over 160 years old and soak up a lot of paint from being so dry.  It took 3 coats to cover the walls.  What keeps me going at this is the outcome of all our projects .  I am one that has a hard time waiting or dragging things on so I just keep on a going!  The first day I painted till my eyes could not focus anymore.  Do not advise doing this as my body ached the day after!  Anywhoo, just thought I would show you a before and after of part of our master bedroom.  I say part of because you would not believe how huge this space is up here.  Someday when I am finished I will make sure to show you the whole shooting match!  Take care my friends!


This is a before photo of the master bedroom in the mill house.  I started painting the trim on the left window and remembered that I needed to take a before photo.  I always like before and after photos.  I also added the mirror and 2 smaller pics a few days ago which is behind the bed and did not like that look at all!


Add caption
Here is the after photo.  Big difference wouldn't you say?  I love how bright and airy feeling it is now.  

Sunday, April 10, 2016

Old wooden windmill added to Mill

     Well we finally have the old wooden windmill top hanging in the mill.  When we purchased our property several years back, we inherited the original wooden windmill that was used on this property years ago.  We always knew that we would find a use for it and we have.  It now is hanging on a huge wall in the atrium part of the mill on the second floor.

     I believe it is at least 6' tall.  It is huge!  So glad that my brother in law was willing to help give it a new home in our mill.  My husband used his handmade crane to lift it up.  I was so skeptical when my hubby Ross had told me of his idea to make a crane inside the mill for lifting furniture and such up to the second and also 3rd floor.  All I could think of was how hideous it is going to look inside the mill.

     He proved me wrong!  It looks like it belongs in the mill and blends in nicely.  The crane has also been such a back saver.  So many very heavy pieces of furniture, washer and dryer went up way of the crane.  It is not uncommon for Ross to invent such things.  He is such a clever man!

     After it was attached to the wall, my brother in law Perry had a spot light that he added to a beam to highlight and accent the wind mill at night.  Cant wait to see it when it gets darker!  Just love how it makes a statement in here.  A conversation piece indeed.

     Here are a few photos of the process of hanging the wind mill.  Can't wait till our next project, whatever that may be!


Here is the before photo of the wall the windmill will hang on.  Looking at it from the main floor up to the second floor area.


Now it is being lifted by the crane up to where it will hang.


Now this is where muscle is needed to lift up onto that peg looking thingy.


It's up!!!!


Wow!  Now this is what I'm talking about!  Sure makes a statement.


Here is a look from another angle.  Looking up from the main floor.


Here is my husband Ross.  This is the crane he built that I mentioned earlier.

Saturday, April 9, 2016

French Doors made into room divider

     When we moved into our mill, I had no idea of how hard it would be to decorate with an open floor concept.  Having walls in a room is so much easier I think.  I just miss not having a few other walls to add a cupboard here, a few pictures there and so on.

     I feel that I have done a good job at furniture placement, but just needed an extra wall to add a buffet table or something into the dining area.  We had these 4 matching french doors which have plenty of glass windows to see through that I just love.  I proposed to my husband that we use them on the main floor to break up the space between dining room and sitting area.  He was totally all for it!  He trusts my judgement as he is not the decorator.

     One side of the french doors is painted black and the other side is wood.  Perfect!  The black side is facing the dining room.  Right now he has them standing upward by using L brackets but when he has a chance we are thinking of hanging them from the beams off the floor about 2 inches instead.  I can not get over how great they look!  Total transformation!  I love the fact that I can see into the sitting area or visa versa through the french doors.  They still let the light flow freely through the whole area.

     Now that the french doors are in place I need to find a great piece to have in front of the wall facing the dining room.  I am thinking some sort of buffet.    I would like it to be open at the bottom so that the piece of furniture will not obscure or block any light and also I do not want to see the back of a cupboard from the other side.  My husband and I found the perfect piece to go there, but needs some work.  Will show pics of what we have in mind later.  It's going to look great I do believe.  So here are a few photos of both sides of the french doors in place in the mill.

     I just get so excited when we can find things we already have and use them in the Mill.  Hope you like them too!


There is a small gap between the two sets of french doors that will be fixed if we plan to keep them on the floor instead of hanging them. 


Here is a view of the other side into the sitting area.


Wednesday, April 6, 2016

Update on our 160 year old flour mill renovation.


     Hi everyone.  I can not tell you how excited I am to share with you our progress on the mill.  We certainly have a ways to go but yet we have came such a long way.  We moved into the mill a week before Thanksgiving of last year.  Enjoying every minute living here.  Click on the link below to view images of what we have accomplished thus far.  More to come soon!


SHORT TOUR OF WHAT WE HAVE FINISHED INSIDE THE MILL

Friday, July 17, 2015

Let the painting begin!

     Hi my friends, It is amazing how you can take a can of paint (many cans in my case) and turn a room into something totally different. Choosing a color of paint for your walls can be a real head scratcher sometimes. If your like me and love to redecorate a room or two often, I always revert to a good ole neutral color on the walls such as a soft creamy white or beige, sometimes a hint of buttery white is pretty also. I took into consideration a few factors when deciding what color to paint the walls in this ole 160 year old mill.

      Firstly, I thought...Theresa, how often are you going to want to repaint these 15 foot high walls? Answer...I don't ever want to do this again!! So, I had to make sure that the color that was going on these walls is what I could live with for a very long time.

      Next question....Theresa (that's me) what style are you going for? Answer...I love to incorporate old, worn, weathered pieces into any room with a light, airy feeling. I love a more neutral pallete of creams, whites, blues, old greens, and faded yellows, and of course, let's not forget aged wood. Now if I were to combine all these elements into my style, I would have to say it is eclectic country farmhouse,  with a twist of Modern elements,  and a touch of english cottage.

      Geez, That was tough! Have you asked yourself that question before? It's hard when you love so many styles and to try to attach a label to it? So, where was I?, Oh yes, next question I asked myself...Theresa (that's me again), what colors do you love to decorate with? Now, this is fairly easy for me. I love to use many soft colors of blues, creams, and at holidays more bolder colors of oranges, and reds. So therefore I needed a neutral color on the walls that would go with all the colors of my pillows, rugs, and such.

      The color of paint I chose to use? Drum roll please.........A soft antique white. So far, I am loving the color. Originally the ole flour mill had white walls. So I find it lends itself to this color also. As I paint each wall, the more and more it is reminding me of a country cottage, or a cottage on a beach. It just has that feel about it. Sometimes you have to let the house speak to you. I have some great ideas for this ole gal (the mill not me) and hope soon I can start to add my furnishings. So enough said, here are a few before and after photos of the bathroom painted.  Note to self....Make sure to take before and after photos from the same place.


Look how bright and airy this room has become.  Love it!  Can't wait to start decorating in here, and to soak in this tub!
Here is a before photo


 Here is after paint.  My husband added a small light behind the enclosed leaded glass case.


Before painting walls in bathroom.

Here is after painting.  This is the wall where the sink is and a large mirror will hang.

Before painting of bathroom.


Monday, June 22, 2015

BEFORE PHOTOS OF BATHROOM AT MILL

Well, it's finally time to get painting inside the mill.  Let me tell you, there is plenty of painting to do.  If you're into the stock market, you might want to invest in the paint stock!  I will be using plenty of it.  I thought I would share before photos of the bathroom project which will be where I am going to start in this big old mill.

The pictures might not show just how large this bathroom is, but it is a nice size.  I don't know about you, but I always disliked my small bathrooms in previous homes I have lived in.  In this room, I want to create a nice color palette of white and linen for a French Country style.

Let me start by showing you the outside of the bathroom.  I chose these beautiful french doors which we had purchased at a restore for $125.00  I will be making inside curtains for them.  Everything we are doing in this mill is being done on a shoestring budget.


I wanted to add interest to this opening to the bathroom, which we did by just adding these doors, but I went a step further and had my hubby build me a shelf above door adding these really old, chippy white corbels.  We also had some chippy trim that he added under neath shelf.  This will be a great shelf to add some nice Ironstone pieces that I have been collecting for a while.  So let's open the doors and go inside shall we?


Please excuse the mess.  Like I said, these are the before photos.  Lots of cleaning needs to be done.  The floors in this bathroom were also purchased from a restore.  Beautiful, pine floors.  Add a nice warmth to the room already.  Can't wait to see them cleaned up!  The hanging chandelier is also a purchase from the restore.  You can't tell, but it is really a massive fixture.  I will unveil it at another time when the whole room is finished.  The cost for the flooring was 100 bucks, the chandelier cost us 175.00.  This old, deep, claw foot tub was one was given to us from a neighbor down the road.   I had made this pair of curtains from drop cloths.  I will tell you all about them and the rods on my next post.  Just love how they turned out.  Wait til I tell you about those curtain rods!

The bath tub is angled almost in the middle of this room.  Sink is to the left, toilet is to the right.


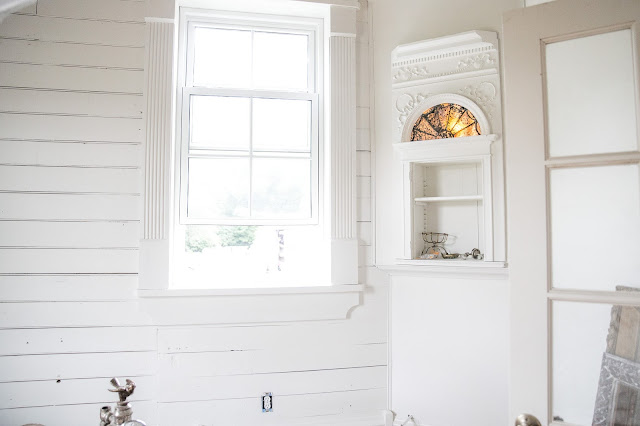
This sink is new, and was purchased at Menard's on sale for 130.00, normally a 600 dollar sink.  Right now it has a board sitting on top for some reason or another.  We still need to add the faucets.  The antique mirror will be hung just above it that we purchased at a garage sale for 50.00.  It has beveled glass mirror.  Above the mirror is a piece of the mill's flour shoot that we incorporated into a fixture for the light.  The light is antique and purchased at the restore for little or nothing.


This is the other corner of the bathroom.  It has an angled wall where the toilet will be.  Above the toilet is an antique cubby with leaded glass, beautifully detailed molding and 2 small shelf inserts.  It will be painted and have a small light inserted to shine through the glass.  We had purchased this antique cubby for 250.00 at a restore.  Love restores!

Well I hope you enjoyed my little tour of before photos of the bathroom.  I hope to start painting any day now.  Can't wait to show you after photos!

Stay tuned for my next post on the drop cloth curtains and those rods that we made!  Thank you for stopping by!  Be sure to tell your friends about this blog for me.  Would love to gain more viewers!  Have a wonderful day!

Wednesday, June 17, 2015

Getting ready to paint

Hello folks, The mill is taking shape now and is going to start to get an interior face lift with paint! I am going to start with the main floor bathroom next week. We are busy at the moment getting things ready for a huge barn sale this weekend and will be closing our store. So much work involved with closing a store. So I will make sure to take a few before photos of bathroom and after of course. It is pretty neat. French doors, huge chandalier over tub, and more. Making drop cloth curtains also. Just wait and see this transformation! Got to go. See you all next week hopefully!

Tuesday, February 10, 2015

I'm Back!

How do I begin to tell you all why my blog has been neglected for so long? Let's see....first, I had hurt my back pretty darn good which had put me out of commission for quite some time. It was all I could do to stand and do my hair in the morning. I even resorted to buying a wig to alleviate that problem. I hate wigs, hot and itchy! I was even having a hard time sitting. I still to this day do not know how it happened. I happened to have a slipped vertibrae, degenerative joint disease, and arthritis. Doc said it was all the rough housing over the years that did it. Second...I have been busy trying to get my new business up and running with photography. So much work involved in that process and is still ongoing! You can check it out here if your curious at . Third....The old mill that we have been working on is coming along fabulously! We hope to be in there by this summer! Whoohooo!. Sorry, I get excited about this. I will be posting many photos from this journey. You would not believe the changes that have been taken place already! I just can't wait to finally be able to decorate in there! Even though I have a bad back, I can and will continue to decorate.
Just to recap, here is the beginning of our major project/renovations on the old mill.
In these photos, We had just finished the railing that goes around the atrium which overlooks the downstairs livingroom area. We had kept some pretty cool, large mill gears. Another photo is looking up from the main floor looking at the railing. Never mind those corbels hanging up on each side of the soon to be bathroom. I told my hubby that I did not like them and they are now down. He tried. I will try to post another update when I can. We just finished all the floors in the mill with beautiful hardwood flooring. What a transformation it made. Can't wait to show you, but it is pretty dusty right now. I want to take photos of clean flooring. My hubby and I think that our store has sold. Just waiting to hear soon if they were able to get the financing. If so, wow we will be busy with dealing with store inventory, moving everything out, yada, yada, yada. So please be patient with me during our journey. I promise that there will be plenty of decorating photos to show you hopefully soon!

Saturday, February 22, 2014

Invasion of bunnies

Invasion of Bunnies?  Well, kind of.  I decided that I am going to start my Easter decorating early and I thought that the chippy white mantel would be a great place to start.

I just love the pretty pastel colors that Spring and Easter bring (not to mention warmer weather).  I love to collect smaller size  bunnies in all shapes and sizes.  The smaller sizes work well to set in any space such as shelves, on dishes, table settings, baskets and well just about anywhere you want a touch of bunnies!

I would like to also thank everyone for your wonderful comments that I have been recieving.
It really means alot to me.  I am hoping to figure out how to add a reply button.  I am always fearful of tinkering around and then loose my blog or worse... you as a friend!  So if you have any questions, I will reply in another comment.

I HOPE YOU ENJOY MY LITTLE TOUCH OF EASTER BUNNIES!

Sites I've joined this week...

Confessions of a plate addict ~ The Scoop
The Dedicated House ~ Make it Pretty
Work it Wednesday ~ The Blissful Bee

I love this Easter banner that I had purchased last year from the Pottery Barn on clearance!   Score!!!!  For $12.00  


I had some dried branches that I added to a large ironstone pitcher and then added my mercury colored eggs that I had purchased on clearance sale last year at Pottery Barn.  Love a great bargain!


Here is a better picture of my favorite old quilt.  It has beautiful colors and quilting.  I had purchased it a few years ago at an antique show in Illinois while in Bishop Hill.  Please disregard that   black cord.  It has been so cold here in Wisconsin that we have used space heaters to help with sky rocketing costs of fuel.  So I see now that It should of been cropped out of picture.


See the lettering on this banner?  I think you could easily make one like this.  Burlap material and white material,  thick twine, paint and stencils and hot glue should be all you need to do this project.